Zentangle Process
The very best way to take advantage of the meditative effects of Zentangle is to follow the standard 8 steps suggested by Rick and Maria. These simple steps allow the drawing to take shape without pre-planning the outcome. Relaxation is quickly achieved and the outcome brings a wonderful sense of satisfaction.
Strings
One of the keys to this process is the String. During CZT training, Rick Roberts referred to the string through a story of making rock candy with his grandmother. The string, dangled above the table and gently released creates a layered shape of many sections delicately encased by the string.
We can use the string concept with simple pencil marks on a tile or in a more formal manner by using a predefined template. It is fun to use many different types of strings, and when we control the outcome or plan the tangles we will use, it is called Zentangle Inspired Art.
Facebook Templates
The Facebook group Ornation Creation is a wonderful source of templates. Ben Kwok is an artist who freely shares his talent with all of us through his FB page. He has mandalas, birds, dogs, bears and other animals to choose from.
Pinterest Templates
Pinterest is a great source of different types of templates. The best ones tend to be created for stained glass artists. These templates have many “string” sections for glass or tangles. Another source is embroidery templates. The expectation with embroidery templates is that each section will be “painted” with a different color thread.
Use google or Pinterest to search for “printables”, “stained glass templates” or “embroidery templates” to see 100s of options. You will find that some of the links lead to sales sites where you have to pay for the template. I ignored those. Other sites might ask for your email address. Those sites aren’t so bad but you might be spammed later. The best sites are the ones that simply allow you to download the template.
The printable minefield is why I created a special Pinterest board to collect templates that are easy to access and free. Just follow this board and you will have easy access to a growing list of templates suitable for tangling.
4 step Process
I use a quick and easy 4-step process for creating with a template.
Step 1 – Find and Print
Picking a template to use for your masterpiece can be a challenge. There are just too many to choose from!
Once you have selected your template, decide what size you want. I like to work with something that will fit into a standard 5x7 inch frame because they are easy to find and reasonably priced (check out the dollar store). I tend to work back from the frame size so that I don’t have to hunt around for a frame that will work after the fact.
In my example I printed the template at 8x8, which will make it difficult to frame.
Download or save the chosen template to your desktop. Open MS Word or another document program. Insert or copy and paste the template into the program. Next adjust the size and orientation to fit your desired frame.
A word about paper….
I used mixed media paper for my template because I knew I was going to add colour. Regular cardstock is a good choice for pen work and coloured pencil colouring. Watercolour paper can be used if your printer will handle that level of thickness.
Once you have printed the template on your chosen paper you will need to test the ink to ensure it is dry enough to draw. Some printer inks take quite a while to dry.
Step 2 – Colour the Template
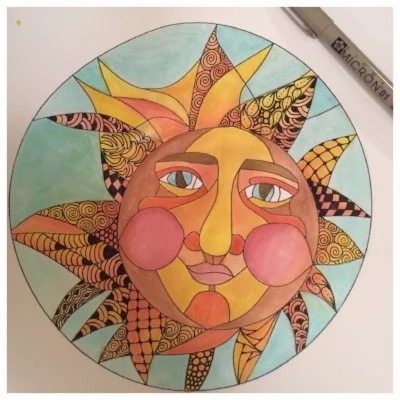
I coloured my template before drawing because I wanted to use Twinkling H2O watercolours. Twinks have such a nice shimmery look making them perfect for my sun. It is best to draw on top of a watercolour or acrylic medium. If you are using pencil crayons or markers then you can colour after drawing.
Since I chose a sun picture, I used Bashful Blue in the background and a variety of yellow, orange and gold tints for the sun.
I used the wet-on-dry technique, which means that my paper was dry when I applied the wet brush with colour. My favourite tool for these colours is a waterbrush. This type of brush allows for a steady stream of water if needed.
Step 3 – Tangle and shade
Ah tangle time!
First I tangled the rays with all my favourites. I have linked each of these tangles to step outs on Tanglepatterns.com or from its original source for ease of use.
Looking at the tangled template at an angle lets you see a little bit of the shading. I added graphite around the sun face to make it pop. Next I shaded each of the sun-ray tangles to emphasise its best features.
I left some of the sun untangled to provide contrast for the rays. I used these tangles for the face:
- Joki - cheaks
- Well - nose
- Floorz
- Henna Drum - chin
- Peaks Border
Step 4 – Frame and Admire
Cut your finished project to the size needed for the frame. In my case, I printed the template on an 8 1/2 x 11 piece of cardstock so I needed to trim it down to 9x9 for my 8x8 frame.
Here is the finished piece......
Related Articles
Until next time, keep on Tangling!
NancyD


