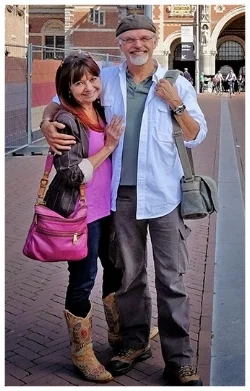
Love Leads the Way
Did you know that the story of Zentangle™ is actually a love story?
It’s about the love of flourishing, flowing calligraphy lines and the love of a simple lifestyle making calming musical flutes. The love of humanity and a desire to help people realise their desire to draw beautiful designs.
Two different views that converged into an amazing method of teaching the average person to draw interesting and seemingly complicated repetitive patterns.
Rick Roberts enjoyed a variety of career interests in music and the tech industry before seeking a simple life focused on meditation. His monk-like lifestyle brings out the “Zen” in the process.
Maria Thomas is an amazing artist and celebrated calligrapher who built and ran multiple businesses based on art and later calligraphy. Her gorgeous and intricate flourishes became the “Tangle”.
It is this paring of two long-time friends and then partners that developed the celebration and simple to follow process steps we now know as Zentangle™.
Process Seed Ideas
Maria, an accomplished calligrapher, sold her designs at local craft fares. She personally inscribed each print to the delight of her buyers. She often heard comments about the beautiful and intricate nature of her work, and “If only I could do that, I would be so happy.” This phrase, repeated over and over began to develop the seed idea of a simple, step by step process that anyone can follow.
Rick and Maria also heard many reasons why someone would not be able to do what Maria does with her pen. Reasons (or excuses) like, “I don’t have time”, “I don’t have your ability” and “I don’t have the patience to do something like that.” These reasons became what many Certified Zentangle Teachers refer to as the “list of 10”. Another seed idea to make a process that is simple and easy to follow with minimal tools.
Rick and Maria later reflected on the 10 most common reasons why someone cannot draw or do art. They don’t have enough:
Time
Money
Space
Ability
Patience
Tools
Training
Confidence
Talent
Motivation
A Mindful Process
Rick with a background in meditation realised that Maria was extremely focused while drawing the scrolling, flourishing lines of calligraphy. She was so focused that one day Rick could not get her attention from across the room, even with his loud voice calling her. Another seed idea was born for a mindful focused process!
Putting all these seed ideas and experiences together Rick and Maria developed the Zentangle ™ meditative drawing method. The Book of Zentangle, by Rick Roberts and Maria Thomas describes Zentangle as a practice.
“The Zentangle method is:
An art form
A life skill
A tool
A perspective
An approach to mindfulness"
This has been true in my life as I explore the process and grow my drawing skills.
The Zentangle Meditative Drawing Method
Together they created a simple, easy to follow, step by step ceremony like process. Zentangle can be done with very simple tools – paper and a pen (add a pencil and smudge stick for shading).
The Zentangle method at its core is just eight simple steps:
1. Gratitude and Appreciation – for me this means having gratitude for the time I have available to sit quietly and tangle. I also feel a sense of appreciation for the quality materials we use such as the high cotton fiber content paper we use for our 3 ½ inch square tiles.
2. Corner Dots – with your pencil add light dots in each corner of the paper.
3. Boarder – connect the dots with a light pencil line. This provides boundary lines for the next steps.
4. String – we further divide our small art space by adding what we call a “string”. This is a light pencil line further dividing up the space between the boundary lines. Tanglepatterns.com is a great source for creative strings.
5. Tangle – this is my favorite part! Choose a tangle for each section of the paper. Tanglepatterns.com and Pattern-collections.com are both great sources for hundreds of tangles. You will also find new tangles published from Maria’s blog at Zentangle.blogspot.com.
6. Shade – this step is optional but I find that adding a little shading really makes the designs pop. Using the pencil add shades of grey to create contrast and dimension.
7. Initial and Sign – this finished design is your art. Part of valuing what you have done is to initial the front and sign and date the back. It is also great to see how you progress over time by looking at your old tiles.
8. Appreciate – take the time to hold the tile at arms’ length and admire you work. Turn it in different directions to see how it looks.
Well, that’s it! A very simple, easy to follow process for beginning your Zentangle drawing journey. You can find out more about this love story by going to the Zentangle website.
Thanks to Rick and Maria for bringing us a mindful process, born from their mutual love and respect. They truly have a desire to help us all learn to draw, and as Rick puts it, “Anything is possible one stroke at a time”.
P.S. You can learn more about Zentangle and drawing by taking one of my Zentangle classes. Check out the options here….
Related Articles
Don't miss a single post - subscribe to receive the latest news and tutorials!


